Spring-容器
一、容器的基本用法
bean是Spring最核心的东西。现在通常使用注解的方式实现bean的定义,但是xml也是一种常用方式,下面我们会通过xml的方式来了解整个bean容器加载的过程。
首先,你需要在你的项目配置文件中,添加spring.xml的配置文件,通过bean标签定义你的bean实例,然后,完成你定义的类,最后,通过XmlBeanFactory去加载spring.xml文件,完成bean示例的加载,这应该是最简单的bean容器的用法。
<?xml version="1.0" encoding="UTF-8"?>
<beans xmlns="http://www.springframework.org/schema/beans"
       xmlns:aop="http://www.springframework.org/schema/aop"
       xmlns:xsi="http://www.w3.org/2001/XMLSchema-instance" xmlns:util="http://www.springframework.org/schema/util"
       xsi:schemaLocation="http://www.springframework.org/schema/beans
           http://www.springframework.org/schema/beans/spring-beans.xsd
           http://www.springframework.org/schema/aop
           http://www.springframework.org/schema/aop/spring-aop.xsd http://www.springframework.org/schema/util https://www.springframework.org/schema/util/spring-util.xsd">

    <bean id="myBeanTest" class="bean.MyBeanTest"/>

</beans>
public class MyBeanTest {

    private String testStr="hello,world!";

    public String getTestStr(){
        return testStr;
    }
    public void setTestStr(String testStr){
        this.testStr=testStr;
    }


    @Elvin
    public void test(){
        System.out.println("执行了MyBeanTest中的test()方法");
    }

}
	@Test
    public void test1(){
        XmlBeanFactory beanFactory = new XmlBeanFactory(new ClassPathResource("spring.xml"));
        MyBeanTest myBeanTest = (MyBeanTest) beanFactory.getBean("myBeanTest");
        System.out.println(myBeanTest.getTestStr());
    }
二、Spring的结构组成
整个测试代码其实逻辑很简单,就做了三件事情:
- 读取Spring.xml的配置文件;
- 根据配置文件,找到对应的类,并实例化;
- 调用实例化后对象的方法;
但Spring真的有这么简单吗?
2.1核心类介绍
在深入代码之前,首先介绍一下bean容器的两个核心类。
2.1.1DefaultListableBeanFactory
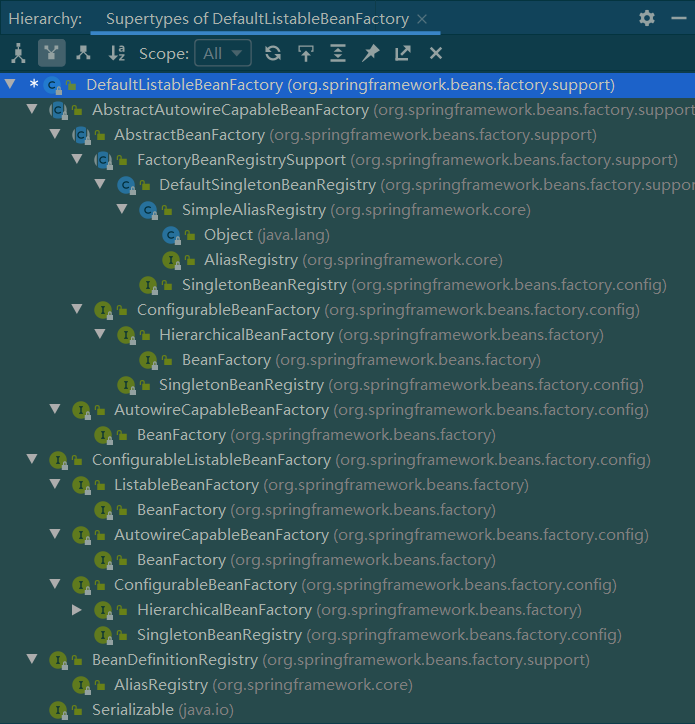
XmlBeanFactory继承自DefaultListableBeanFactory,而DefaultListableBeanFactory是整个bean加载的核心部分,是Spring注册及加载Bean的默认实现。XmlBeanFactory与DefaultListableBeanFactory的不同之处在于,XmlBeanFactory使用了自定义的XmlBeanDefinitionReader,实现了个性化的BeanDefinitionReader读取。

整个DefaultListableBeanFactory的继承关系很复杂,简单聊一聊上面类图中各个类的作用:
- AliasRegistry:定义对alias(别名)的简单增删改操作;
- SimpleAliasRegistry:主要用map做alias的缓存,并对alias的接口实现;
- SingletonBeanRegistry:定义对单例的注册以及获取;
- DefaultSingletonBeanRegistry:对SingletonBeanRegistry接口的各种实现;
- FactoryBeanRegisterSupport:在DefaultSingletonBeanRegistry基础上增加了对FactoryBean的特殊处理;
- BeanFactory:定义获取bean以及bean的各种属性;
- HierarchicalBeanFactory:继承BeanFactory,也就是在BeanFactory定义的功能基础上增加了对parentFactory的支持;
- BeanDefinitionRegistry:定义对BeanDefinition的各种增删改查操作;
- ConfiguralbeBeanFactory:提供配置Factory的各种方法;
- ListableBeanFactory:根据各种条件获取bean的配置清单;
- AbstractBeanFactory:综合FactoryBeanRegisterSupport和ConfiguralbeBeanFactory的功能;
- AutowireCapableBeanFactory:提供创建bean、自动注入、初始化以及应用bean的后处理器;
- AbstractAutowireCapableBeanFactory:综合AbstractBeanFactory,并对AutowireCapableBeanFactory进行实现;
- ConfigurableListableBeanFactory:BeanFactory配置清单,指定忽略类型和接口等;
- DeafultListableBeanFactory:综合上面所有功能,主要是对bean注册后的处理;
XmlBeanFactory扩展了DefaultListableBeanFactory从XML文档中读取BeanDefinition的能力,对于注册及获取bean都是使用父类DefaultListableBeanFactory的方法,而这个个性化实现,是通过添加的XmlBeanDefinitionReader的属性。
2.1.2XmlBeanDefinitionReader
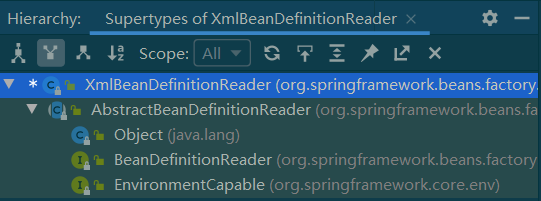
XML配置文件的读取是Spring中的重要功能,因为Spring的大部分功能都是以配置为切入点,还是梳理一下XmlBeanDefinitionReader类的关系。

这个继承关系就比较简单,简单说一下各个功能:
- BeanDefinitionReader:主要定义资源文件读取并转换为BeanDefinition的各个功能;
- EnvironmentCapable:定义获取Environment方法;
- AbstractBeanDefinitionReader:对BeanDefinitionReader、EnvironmentCapable定义的类功能的实现;
2.2容器的基础XmlBeanFactory
接下来就是正式的深入源码。
	@Test
    public void test1(){
        XmlBeanFactory beanFactory = new XmlBeanFactory(new ClassPathResource("spring.xml"));
        MyBeanTest myBeanTest = (MyBeanTest) beanFactory.getBean("myBeanTest");
        System.out.println(myBeanTest.getTestStr());
    }

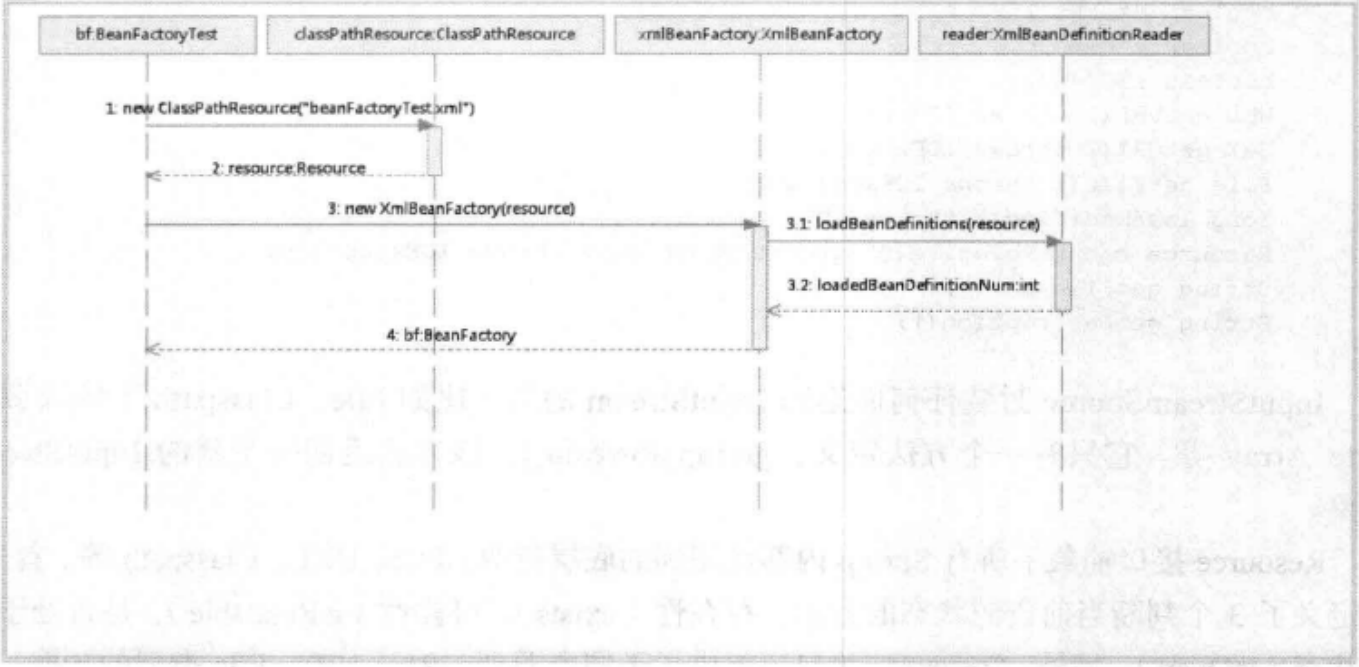
在我们的test代码中,首先通过ClassPathResource构建了Resource对象,然后进行XmlBeanFactory的初始化。那么Resource资源是如何封装的呢?
2.2.1配置文件封装
在Java中,将不同来源的资源抽象成URL,通过注册不同的handler来处理不同来源的资源和读取逻辑,一般handler的类型使用不同前缀来识别。然而url没有默认定义相对Classpath或者ServletContext等资源的handler,而且URL也没有提供一些基本的方法,如检查当前资源是否存在、检查当前资源是否可读等方法。因而Spring使用了自己的抽象结构Resource来封装底层资源。
public interface InputStreamSource {

	InputStream getInputStream() throws IOException;

}
public interface Resource extends InputStreamSource {

	boolean exists();

	default boolean isReadable() {
		return exists();
	}

	default boolean isOpen() {
		return false;
	}

	default boolean isFile() {
		return false;
	}

	URL getURL() throws IOException;

	URI getURI() throws IOException;

	File getFile() throws IOException;

	default ReadableByteChannel readableChannel() throws IOException {
		return Channels.newChannel(getInputStream());
	}

	long contentLength() throws IOException;

	long lastModified() throws IOException;

	Resource createRelative(String relativePath) throws IOException;

	@Nullable
	String getFilename();

	String getDescription();

}
对不同来源的资源文件,Resource都有相应的实现:文件(FileSystemResource)、classpath资源文件(ClassPathResource)、URL资源(UrlResource)、InputStream资源(InputStreamResource)、Byte数组(ByteArrayResource)等。
有了Resource接口可以统一的为资源文件进行处理。至于实现其实非常简单,以getInputStream为例,ClassPathResource中的实现方式便是通过class或者classloader提供的底层方法进行调用,而对FileSystemResource的实现其实更简单,直接使用FileInputStream对文件进行实例化。
2.2.2加载bean
了解了Spring对于配置文件的封装之后,深入一下Resource作为参数的构造方法:
	public XmlBeanFactory(Resource resource) throws BeansException {
		this(resource, null);
	}


	public XmlBeanFactory(Resource resource, BeanFactory parentBeanFactory) throws BeansException {
		super(parentBeanFactory);
		this.reader.loadBeanDefinitions(resource);
	}
	//super(parentBeanFactory)方法调用
	public AbstractAutowireCapableBeanFactory() {
		super();
		ignoreDependencyInterface(BeanNameAware.class);
		ignoreDependencyInterface(BeanFactoryAware.class);
		ignoreDependencyInterface(BeanClassLoaderAware.class);
		if (NativeDetector.inNativeImage()) {
			this.instantiationStrategy = new SimpleInstantiationStrategy();
		}
		else {
			this.instantiationStrategy = new CglibSubclassingInstantiationStrategy();
		}
	}
super()方法,主要设置忽略给定接口的自动装配功能。这里的忽略,实际是指在自动装配时忽略该接口实现类中和setter方法入参相同的类型,也就是忽略该接口实现类中存在依赖外部的bean属性注入。
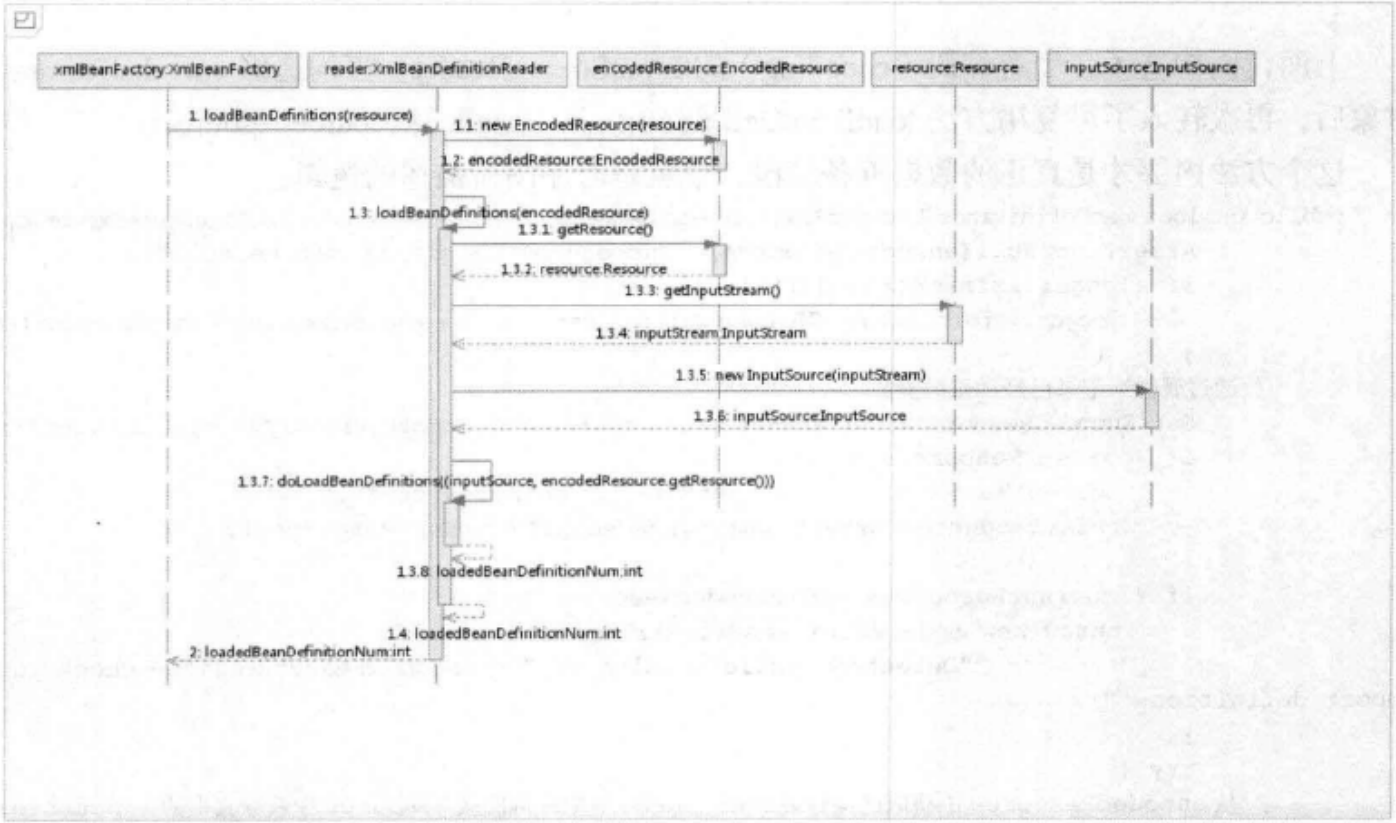
这里的this.reader.loadBeanDefinitions(resource)才是资源加载的真正实现。

可以看到,在真正进行xml文件解析之前,还进行了很多的准备工作:
- 封装资源通过。将Resource参数,通过EncodedResource进行封装;
- 获取输入流。从Resource中获取InputStream并构造成InputSource;
- 通过构造的InputSource和Resource实例,继续doLoadBeanDefinitions方法调用;
这个EncodedResource其实就是一个字符集设置的作用,正式方法如下:
	public int loadBeanDefinitions(EncodedResource encodedResource) throws BeanDefinitionStoreException {
		Assert.notNull(encodedResource, "EncodedResource must not be null");
		if (logger.isTraceEnabled()) {
			logger.trace("Loading XML bean definitions from " + encodedResource);
		}

        //通过属性,记录已经加载的资源,避免重复
		Set<EncodedResource> currentResources = this.resourcesCurrentlyBeingLoaded.get();

		if (!currentResources.add(encodedResource)) {
			throw new BeanDefinitionStoreException(
					"Detected cyclic loading of " + encodedResource + " - check your import definitions!");
		}

		try (InputStream inputStream = encodedResource.getResource().getInputStream()) {
			InputSource inputSource = new InputSource(inputStream);
			if (encodedResource.getEncoding() != null) {
				inputSource.setEncoding(encodedResource.getEncoding());
			}
            //真正的核心逻辑
			return doLoadBeanDefinitions(inputSource, encodedResource.getResource());
		}
		catch (IOException ex) {
			throw new BeanDefinitionStoreException(
					"IOException parsing XML document from " + encodedResource.getResource(), ex);
		}
		finally {
			currentResources.remove(encodedResource);
			if (currentResources.isEmpty()) {
				this.resourcesCurrentlyBeingLoaded.remove();
			}
		}
	}
	protected int doLoadBeanDefinitions(InputSource inputSource, Resource resource)
			throws BeanDefinitionStoreException {

		try {
            //加载xml文件,并获取对应的Document实例
			Document doc = doLoadDocument(inputSource, resource);
            //根据Document实例,注册bean
			int count = registerBeanDefinitions(doc, resource);
			if (logger.isDebugEnabled()) {
				logger.debug("Loaded " + count + " bean definitions from " + resource);
			}
			return count;
		}
		catch (BeanDefinitionStoreException ex) {
			throw ex;
		}
		catch (SAXParseException ex) {
			throw new XmlBeanDefinitionStoreException(resource.getDescription(),
					"Line " + ex.getLineNumber() + " in XML document from " + resource + " is invalid", ex);
		}
		catch (SAXException ex) {
			throw new XmlBeanDefinitionStoreException(resource.getDescription(),
					"XML document from " + resource + " is invalid", ex);
		}
		catch (ParserConfigurationException ex) {
			throw new BeanDefinitionStoreException(resource.getDescription(),
					"Parser configuration exception parsing XML from " + resource, ex);
		}
		catch (IOException ex) {
			throw new BeanDefinitionStoreException(resource.getDescription(),
					"IOException parsing XML document from " + resource, ex);
		}
		catch (Throwable ex) {
			throw new BeanDefinitionStoreException(resource.getDescription(),
					"Unexpected exception parsing XML document from " + resource, ex);
		}
	}
具体怎么获取Document实例就不细说了,其实就是通过Xml的格式进行解析和封装。
2.2.3解析及注册BeanDefinitons
当把文件转化为Document后,接下来的提取及注册就是重头戏了。
public int registerBeanDefinitions(Document doc, Resource resource) throws BeanDefinitionStoreException {
		//实例化BeanDefinitionDocumentReader
    	BeanDefinitionDocumentReader documentReader = createBeanDefinitionDocumentReader();
		int countBefore = getRegistry().getBeanDefinitionCount();
    	//加载及注册bean
		documentReader.registerBeanDefinitions(doc, createReaderContext(resource));
		return getRegistry().getBeanDefinitionCount() - countBefore;
	}
通过BeanDefinitionDocumentReader来完成beanDefinition的解析,可以很好的体验类的单一职责的原则;
	@Override
	public void registerBeanDefinitions(Document doc, XmlReaderContext readerContext) {
		this.readerContext = readerContext;
        //核心逻辑
		doRegisterBeanDefinitions(doc.getDocumentElement());
	}
看到do应该就大概知道,接下来就是核心的代码逻辑了
	protected void doRegisterBeanDefinitions(Element root) {
		BeanDefinitionParserDelegate parent = this.delegate;
		this.delegate = createDelegate(getReaderContext(), root, parent);

		if (this.delegate.isDefaultNamespace(root)) {
            //读取Spring.xml中profile属性,判断不同的生效环境配置(dev、prod、test)
			String profileSpec = root.getAttribute(PROFILE_ATTRIBUTE);
			if (StringUtils.hasText(profileSpec)) {
				String[] specifiedProfiles = StringUtils.tokenizeToStringArray(
						profileSpec, BeanDefinitionParserDelegate.MULTI_VALUE_ATTRIBUTE_DELIMITERS);
				//如果没有配置相应的spring.profiles.active值,无法匹配继续
				if (!getReaderContext().getEnvironment().acceptsProfiles(specifiedProfiles)) {
					if (logger.isDebugEnabled()) {
						logger.debug("Skipped XML bean definition file due to specified profiles [" + profileSpec +
								"] not matching: " + getReaderContext().getResource());
					}
					return;
				}
			}
		}

		preProcessXml(root);
        //真正解析root节点
		parseBeanDefinitions(root, this.delegate);
		postProcessXml(root);

		this.delegate = parent;
	}
看到这还是有一点点小激动的,总算是接触到bean的核心关键点了。但是我们看到在真正解析root节点前的preProcessXml和postProcessXml方法,其实是空的。这空的,其实是留给后来者去实现的。
	protected void parseBeanDefinitions(Element root, BeanDefinitionParserDelegate delegate) {
		if (delegate.isDefaultNamespace(root)) {
			NodeList nl = root.getChildNodes();
			for (int i = 0; i < nl.getLength(); i++) {
				Node node = nl.item(i);
				if (node instanceof Element) {
					Element ele = (Element) node;
					if (delegate.isDefaultNamespace(ele)) {
						parseDefaultElement(ele, delegate);
					}
					else {
						delegate.parseCustomElement(ele);
					}
				}
			}
		}
		else {
			delegate.parseCustomElement(root);
		}
	}
从if判断中可以看出,针对根节点或者子节点如果是默认命名空间的话,使用parseDefaultElement方法解析,否则parseCustomElement解析。parseDefaultElement也是接下来的重点。